
Oven Baked and Grill Finished BBQ Ribs
one of the easiest ways to make tender, flavorful ribs at home
Oven Baked and Grill Finished BBQ Ribs
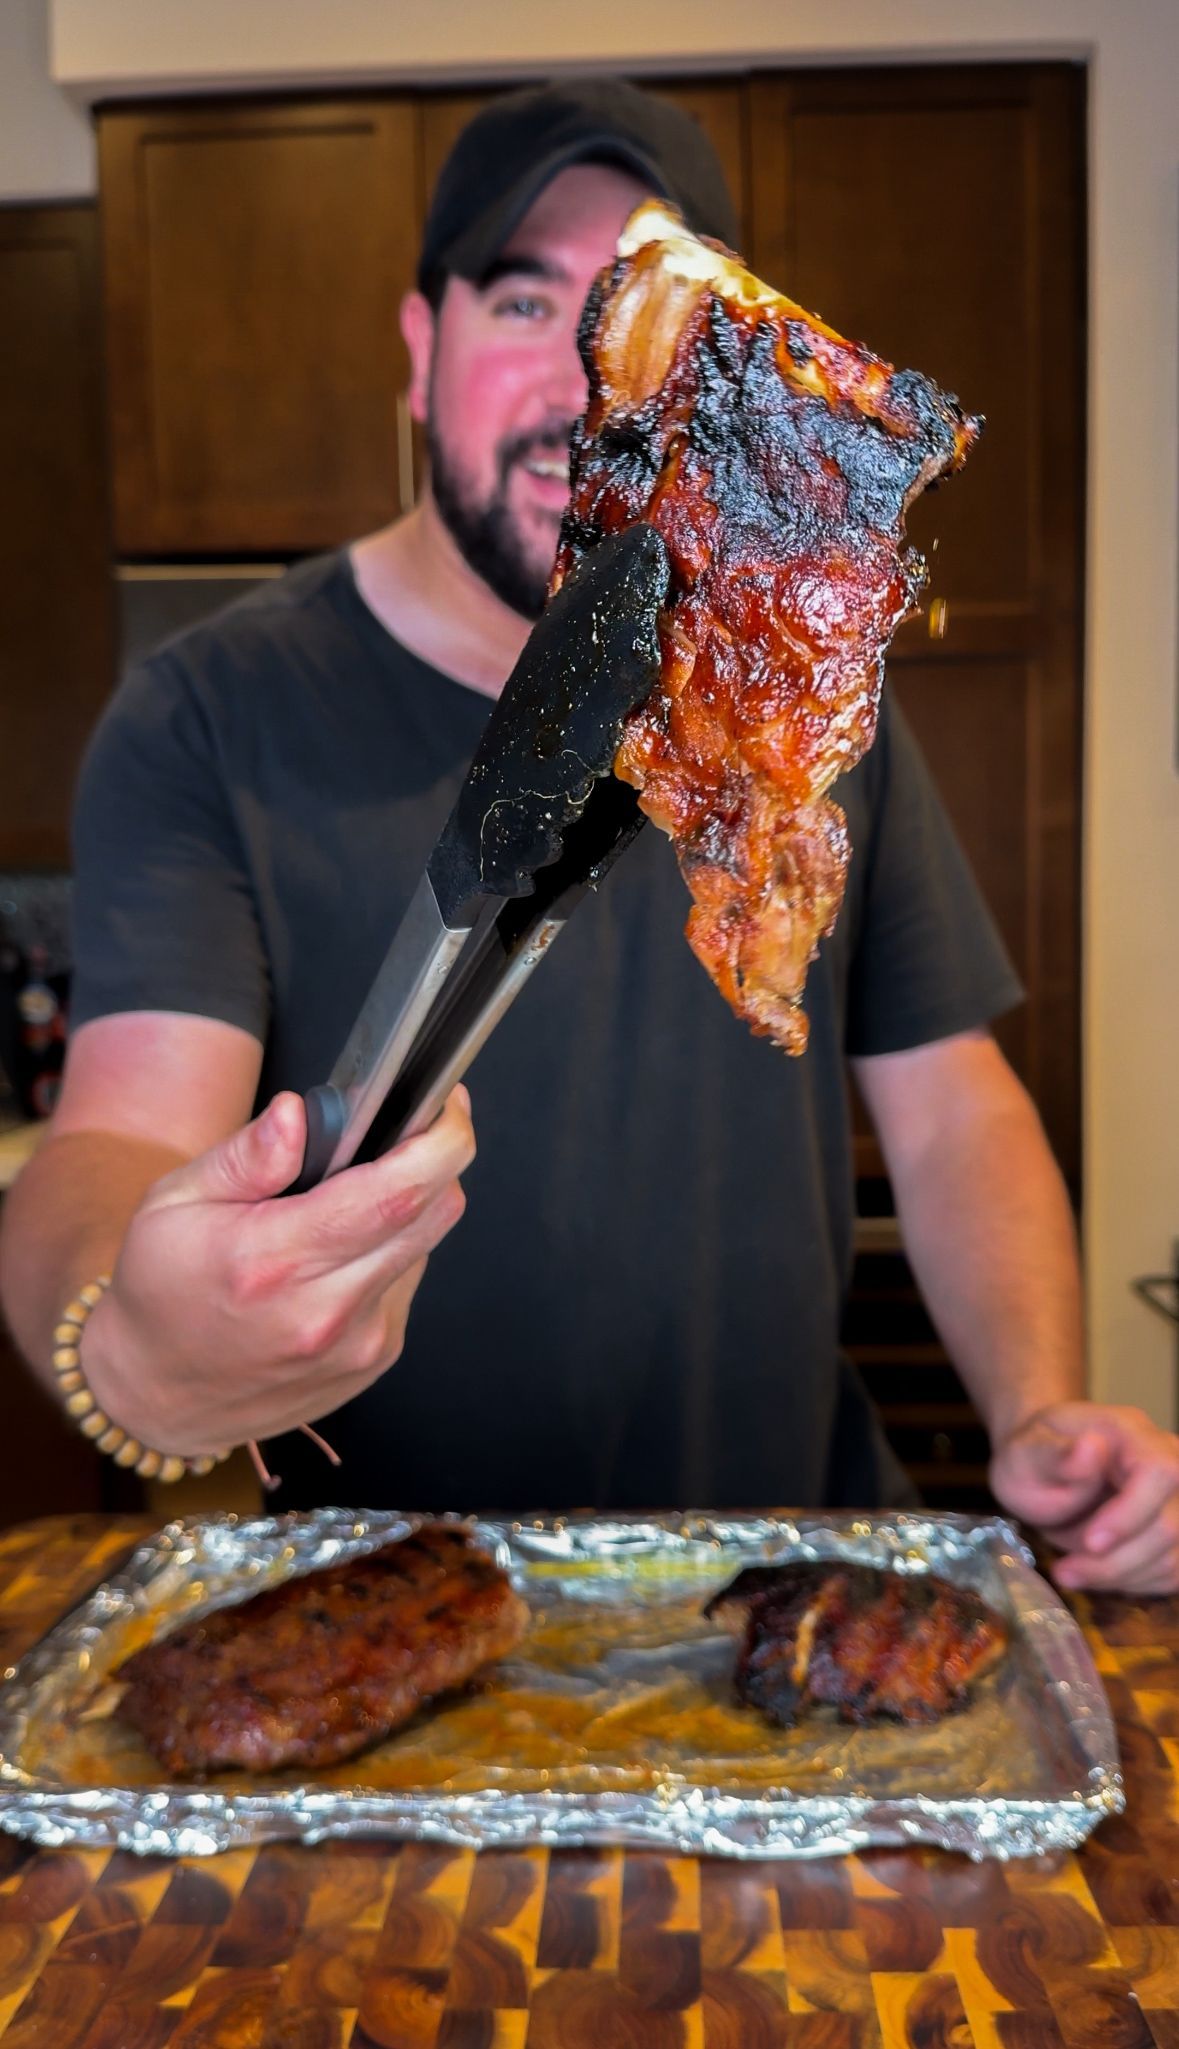
If you are looking for one of the easiest ways to make tender, flavorful ribs at home, these oven baked and grill finished BBQ ribs are the method you need to try. This is one of my favorite ways to cook ribs because it gives you the best of both worlds. The oven does the low and slow work to make the ribs tender, and then the grill gives them the color, char, smoky flavor, and sticky BBQ sauce finish that makes them feel like proper backyard ribs.
The process is simple. Start with a rack of ribs, pat them dry, and remove the membrane. Then use mustard as a binder and season the ribs generously on both sides with your favorite BBQ seasoning blend. Wrap the ribs in foil and bake them at 300 degrees for 2 hours. By the time they come out of the oven, the ribs should already be tender, with the bones starting to poke out.
From there, the ribs go directly onto the grill. You start meat side down over medium-high heat with the lid closed to get some nice color. Then you flip the ribs, brush BBQ sauce over the top, and let the sauce thicken and tack up. After that, you flip again, sauce the bottom, let that side grill, then turn the ribs one more time and sauce them one final time.
By the end, the ribs are tender, saucy, smoky, sticky, and full of flavor. Mine ended up being so tender they broke in half when I took them off the grill, which is honestly the kind of rib problem you want to have.
This method is perfect for anyone who wants ribs that feel like they came off the smoker, but without needing a full smoker setup or spending all day watching the grill. You get the tenderness from the oven and the finish from the grill, which makes this recipe practical, reliable, and still seriously good.
Why You’ll Love These Oven Baked and Grill Finished Ribs
There are a lot of ways to cook ribs, but this oven-and-grill method is one of the most approachable. It gives you a reliable path to tender ribs without having to manage a smoker for hours. The oven keeps the temperature steady, the foil helps lock in moisture, and the grill gives the ribs that final BBQ-style finish.
This is especially helpful if you want ribs at home but do not want the pressure of cooking them entirely on the grill. Ribs can be tricky if the heat is too high or uneven. They can dry out, burn, or cook before they become tender. Starting them in the oven removes a lot of that guesswork.
The mustard binder helps the BBQ seasoning stick to the ribs, and it also adds a subtle tang that works well with the spice rub and BBQ sauce. You do not taste a strong mustard flavor after cooking. It mostly acts as a binder and helps create a flavorful outside layer.
The two-hour oven bake gives the ribs time to tenderize. When you unwrap them, you should already see the bones poking out a bit, which is a good sign that the meat has pulled back and softened. Then the grill finish adds the color and texture that the oven alone does not create.
The sauce timing is also important. Instead of adding BBQ sauce at the beginning and risking it burning, you add it at the end on the grill. This lets the sauce thicken, caramelize slightly, and tack up without turning bitter.
The result is a rack of ribs that is tender inside, flavorful outside, and coated in glossy BBQ sauce. It is easy enough for a weekend dinner and impressive enough for a backyard cookout.
The Best of Both Worlds: Oven Tender, Grill Finished
The reason this method works so well is that each cooking step has a specific job. The oven is for tenderness. The grill is for flavor, color, and sauce.
When ribs are cooked low and slow, the connective tissue breaks down and the meat becomes tender. The oven is great for that because it gives you consistent heat. Wrapping the ribs in foil helps trap moisture and steam, which keeps them from drying out. At 300 degrees, the ribs cook gently enough to become tender but not so low that they take all day.
After 2 hours in the oven, the ribs are already cooked through and tender. Technically, you could sauce them and eat them at that point, but they would be missing the grilled finish. That last step is what makes them taste more like classic BBQ ribs.
The grill adds direct heat, which creates color on the meat side. It also helps the BBQ sauce thicken and cling to the ribs. When the sauce hits the hot ribs and grill heat, it becomes glossy and sticky. That is the texture you want.
If you cook ribs only in the oven, they can be tender but sometimes lack that outdoor BBQ feel. If you cook ribs only on the grill, they can be flavorful but harder to keep tender unless you manage the heat carefully. Combining both methods gives you more control and a better final result.
It is a great method for home cooks because it is forgiving. The oven gives you the tenderness, and the grill gives you the finishing touch.
Ingredients You’ll Need
This recipe is simple, which is part of why it works so well. You do not need a complicated marinade or a long list of ingredients. You just need ribs, mustard, BBQ seasoning, BBQ sauce, and heat.
Rack of Ribs
Start with one rack of ribs. Baby back ribs or spare ribs can both work, but the cooking time may vary slightly depending on the size and thickness of the rack.
Baby back ribs are usually a little smaller, leaner, and more tender. Spare ribs are meatier, richer, and often larger. St. Louis-style ribs are spare ribs that have been trimmed into a more uniform shape, which makes them a great option for this method.
No matter which style you use, the key is to look for ribs with good meat coverage and even thickness. If one end is much thinner than the other, that thinner side may cook faster.
Mustard
Mustard works as the binder in this recipe. You rub it all over the ribs so the seasoning sticks. Yellow mustard is the classic choice because it is affordable, easy to spread, and has a mild tang.
You do not need a thick layer. You just want enough to lightly coat the ribs. Once the ribs are cooked, the mustard flavor mellows out and blends into the BBQ seasoning.
If you are worried about the ribs tasting like mustard, do not be. The final flavor is BBQ-forward, not mustard-heavy.
BBQ Seasoning Blend
Use your favorite BBQ seasoning blend and coat both sides generously. This is where a lot of the flavor comes from, so do not be shy.
A good BBQ rub usually has a mix of salt, pepper, paprika, garlic powder, onion powder, brown sugar, chili powder, and other spices. Some blends are sweeter, some are smokier, and some have more heat.
Since this recipe finishes with BBQ sauce, choose a seasoning blend that complements the sauce you plan to use. If your sauce is sweet, a smoky or spicy rub can help balance it. If your sauce is spicy, a sweeter rub can work really well.
BBQ Sauce
The BBQ sauce goes on during the grill finish. This is what gives the ribs that sticky, glossy coating.
You can use your favorite bottled BBQ sauce or homemade sauce. Sweet, smoky, spicy, tangy, or honey-style sauces all work. The biggest thing is to add the sauce near the end of cooking, not at the beginning.
BBQ sauce usually contains sugar, and sugar can burn over high heat. By adding it during the final minutes on the grill, you give it enough time to thicken and tack up without burning.
Full Ingredient List
1 rack of ribs
Yellow mustard, enough to coat both sides
Your favorite BBQ seasoning blend, enough to generously season both sides
Your favorite BBQ sauce, for brushing
Optional for serving:
Extra BBQ sauce
Pickles
Coleslaw
Cornbread
Mac and cheese
Grilled corn
Potato salad
How to Make Oven Baked and Grill Finished BBQ Ribs
Step 1: Pat the Ribs Dry
Start by removing the ribs from the packaging and patting them dry with paper towels. This helps remove excess moisture from the surface so the mustard and seasoning can stick better.
This is a small step, but it makes a difference. If the ribs are wet, the seasoning can slide around and become uneven. Dry ribs are easier to season and easier to handle.
Place the ribs on a large cutting board or sheet pan so you have enough room to prep them.
Step 2: Remove the Membrane
Flip the rack over so the bone side is facing up. On the back of the ribs, there is usually a thin, silvery membrane. You want to remove it before cooking.
To remove it, slide a butter knife or the handle of a spoon under one corner of the membrane near the bone. Once you get it lifted, grab it with a paper towel and pull it off. The paper towel helps you grip it because the membrane can be slippery.
Sometimes it comes off in one clean piece, and sometimes it tears. If it tears, just grab another section and keep going.
Removing the membrane helps the seasoning reach the meat better and makes the ribs easier to eat. If you leave it on, it can become tough and chewy.
Step 3: Add the Mustard Binder
Once the ribs are dry and the membrane is removed, spread a thin layer of mustard over both sides of the rack.
You do not need to drown the ribs in mustard. Just use enough to lightly coat the surface. The mustard acts like glue for the BBQ seasoning and helps the rub stick evenly.
Make sure to cover both the meat side and the bone side. Even though most of the meat is on top, seasoning both sides gives the ribs better overall flavor.
Step 4: Season Generously
After the mustard is on, coat both sides of the ribs with your favorite BBQ seasoning blend.
This is not the time for a tiny pinch. Ribs can handle a good amount of seasoning, especially because they are wrapped and baked before being finished on the grill.
Make sure the seasoning is evenly distributed across the entire rack, including the edges. Press it gently into the mustard so it sticks.
The seasoning will create the flavor base for the ribs. As the ribs bake in the foil, the seasoning, mustard, and juices from the pork all work together. Then the grill finish adds another layer of flavor once the BBQ sauce goes on.
Step 5: Wrap the Ribs in Foil
Once the ribs are seasoned, wrap them tightly in foil. You want the foil to hold in moisture while the ribs bake.
If your rack is large, you may need two pieces of foil. Make sure the seams are sealed well so juices do not leak out onto your baking sheet.
Place the foil-wrapped ribs on a sheet pan. This makes it easier to move them in and out of the oven and catches any juices if the foil leaks.
Step 6: Bake at 300 Degrees
Place the wrapped ribs in a 300-degree oven and bake for 2 hours.
This is the tenderizing stage. The ribs cook in their own juices inside the foil, which helps soften the meat and keep it moist.
After 2 hours, carefully remove the ribs from the oven. The foil will be hot, and there may be steam when you open it, so be careful.
At this point, the ribs should already look tender. The meat should have pulled back slightly from the bones, and you should see the bones poking out. That is a great sign.
The ribs will be delicate at this stage, so handle them carefully when transferring them to the grill. If they are extra tender, they may bend or even start to break apart.
Step 7: Transfer to the Grill
Preheat your grill to medium-high heat. Once the grill is hot, carefully transfer the ribs directly onto the grates.
Start with the meat side down. Close the lid and grill for about 5 minutes.
This step gives the meat side color and helps create that grilled finish. Since the ribs are already tender from the oven, you are not trying to cook them through here. You are adding flavor, color, and texture.
Keep an eye on the ribs so they do not burn. The seasoning may contain sugar, and the ribs are already tender, so you want color, not charring them beyond recognition.
Step 8: Flip and Sauce the Top
After about 5 minutes, flip the ribs so the bones are facing down and the meat side is facing up.
Brush BBQ sauce over the top of the ribs. Close the lid and grill for another 5 minutes.
This allows the sauce to heat, thicken, and tack up. The sauce should start to look glossy and sticky.
The lid is important because it helps trap heat around the ribs, almost like an outdoor oven. This helps the sauce set instead of just sitting wet on top.
Step 9: Flip and Sauce the Bottom
Next, flip the ribs again and brush sauce onto the bottom side. Close the lid and grill for another 5 minutes.
Even though the bone side does not have as much meat, saucing both sides gives the ribs better flavor and a more complete finish.
This also gives the sauce a chance to caramelize slightly on the underside.
Step 10: Turn One More Time and Sauce Again
Turn the ribs one more time so the meat side is back up. Brush with one final layer of BBQ sauce.
At this point, the ribs should have nice color, and the sauce should be coating them beautifully. Let them grill briefly if needed until the sauce is glossy and tacky.
You do not need to overdo this final step. The goal is a sticky, saucy finish without burning the sauce.
Step 11: Rest, Slice, and Serve
Carefully remove the ribs from the grill. They may be very tender, so use tongs and a spatula if needed to support the rack. If they break in half when you take them off, that just means they are extra tender.
Let the ribs rest for a few minutes before slicing. This helps the juices settle and makes them easier to cut.
Slice between the bones and serve warm with extra BBQ sauce if desired.
How to Tell When the Ribs Are Tender
There are a few signs that your ribs are tender after the oven stage.
The first sign is the bones poking out. When the meat pulls back from the bones, that usually means the ribs have cooked down and started to tenderize.
Another sign is flexibility. If you carefully lift the rack, it should bend. You do not want it stiff. A tender rack of ribs will have some give.
You can also use a toothpick or skewer to test the meat. It should slide in with little resistance.
For this recipe, the oven does most of the tenderizing. The grill is not where the ribs become tender. The grill is where they get color, sauce, and finish.
That is why it is important not to rush the oven step. The 2 hours at 300 degrees gives the ribs time to soften before hitting the grill.
Why Remove the Membrane?
Removing the membrane is one of those steps that can feel annoying, but it is worth doing.
The membrane is the thin layer on the bone side of the ribs. If left on, it can become tough and chewy after cooking. It can also prevent seasoning from fully reaching that side of the ribs.
When you remove it, the ribs are easier to eat and the seasoning can coat the meat more evenly.
Some store-bought ribs may already have the membrane removed, but many do not. It is always worth checking. If the back of the ribs looks shiny and has a thin silver skin, remove it.
A paper towel makes the job much easier because it gives you grip. Once you loosen an edge, grab it and pull slowly.
Why Use Mustard as a Binder?
Mustard is a classic BBQ binder because it helps seasoning stick to the meat. It creates a slightly tacky surface that holds onto the rub.
It also adds a little tang, but it does not make the ribs taste strongly like mustard. After baking and grilling, the mustard flavor blends into the seasoning and sauce.
You can use yellow mustard, Dijon mustard, or even spicy brown mustard, but yellow mustard is the most common and easiest.
If you do not like mustard or do not have it, you can use a light coating of oil instead. However, mustard works especially well for ribs because it helps build a flavorful crust with the seasoning.
BBQ Seasoning Tips
The BBQ seasoning blend you use will have a big impact on the final flavor, so use one you really like.
A sweeter rub will give the ribs a more classic sticky BBQ flavor. A smoky rub will help mimic some of the flavor you would get from a smoker. A spicy rub will balance the sweetness of the BBQ sauce.
Whatever you use, season both sides generously. Ribs are a large cut of meat, and you want flavor in every bite.
One thing to watch is salt. Some BBQ rubs are very salty, while others are more balanced. If your rub has a lot of salt, you do not need to add any extra. If your rub is low-sodium, you may want to season the ribs lightly with salt before adding the rub.
You can also layer flavors by using one rub before baking and a little more before grilling, but for this method, a generous coating before the oven is usually enough.
BBQ Sauce Tips
BBQ sauce should be added during the grill finish, not during the oven bake.
If you add sauce too early, especially a sugary sauce, it can burn or become too dark. By waiting until the ribs are already tender and almost done, you can use the grill to thicken and set the sauce instead of burning it.
Brush the sauce on in layers. The first layer starts to tack up. The second layer adds more flavor. The final layer gives the ribs that glossy finish.
You can use any BBQ sauce you like. Sweet and smoky sauces are classic. Spicy sauces work well if you want more kick. Honey BBQ sauce gives a sticky, sweeter finish. Vinegar-based sauces can make the ribs tangier.
If your sauce is very thick, you can warm it slightly before brushing. This makes it easier to spread. If it is very thin, give it a little extra time on the grill to tack up.
What Heat Should the Grill Be?
For the grill finish, medium-high heat works well. You want enough heat to add color and set the sauce, but not so much that the ribs burn immediately.
Remember, the ribs are already cooked and tender from the oven. The grill step is not about cooking them through. It is about finishing them.
Start meat side down for about 5 minutes with the lid closed. This gives the ribs color on the meaty side. Then flip and sauce.
If your grill runs hot, keep a close eye on them. You can also move the ribs slightly off direct heat if the sauce starts to darken too quickly.
The lid-down grilling helps the sauce tack up because the heat surrounds the ribs. It also helps keep the ribs warm and allows the sauce to set more evenly.
What to Serve with BBQ Ribs
These ribs are the kind of main dish that goes well with all the classic BBQ sides.
Coleslaw is one of the best pairings because it adds crunch and freshness. The creamy, tangy slaw balances the rich, saucy ribs.
Mac and cheese is another classic. The creamy cheese sauce works perfectly with BBQ flavors and makes the meal feel extra comforting.
Cornbread is always a good idea, especially with a little honey butter. It gives you something slightly sweet to serve alongside the smoky, saucy ribs.
Grilled corn is great if you already have the grill going. Brush it with butter, season it with salt, and finish with lime or chili seasoning.
Potato salad is another easy side that works well for cookouts or family dinners.
Baked beans are perfect if you want something hearty and smoky.
You could also serve the ribs with pickles, jalapeños, or pickled onions to cut through the richness. That little bit of acidity helps balance the meal.
For a lighter plate, serve the ribs with a simple cucumber salad, grilled vegetables, or a big green salad.
How to Make These Ribs for a Cookout
This method is great for a cookout because you can do most of the work ahead of time.
Bake the ribs in the oven before guests arrive. Keep them wrapped in foil until you are ready to finish them on the grill. Then, when it is time to eat, all you have to do is grill, sauce, and slice.
This makes the timing much easier. Instead of having everyone wait while the ribs cook for hours, the long cooking step is already done.
If you are making multiple racks, bake them on sheet pans and finish them on the grill in batches. Keep the finished racks loosely covered with foil while the others finish.
You can also set up a sauce bar with a few different BBQ sauces. One sweet, one spicy, and one smoky option gives people variety.
Storage and Reheating
Store leftover ribs in an airtight container or wrap them tightly in foil. Keep them in the refrigerator for up to 3 to 4 days.
To reheat, the oven is the best option. Wrap the ribs in foil and warm them at 300 degrees until heated through. You can add a little extra BBQ sauce before reheating to keep them moist.
You can also reheat them on the grill over lower heat. Brush with more sauce and heat until warmed through.
The microwave works if you need a quick option, but it can make the ribs a little softer and less evenly heated.
If you want to freeze leftovers, wrap the ribs tightly in foil and place them in a freezer-safe bag. Freeze for up to 2 months. Thaw in the refrigerator before reheating.
Common Mistakes to Avoid
One common mistake is forgetting to remove the membrane. This can make the ribs harder to eat and prevent seasoning from fully penetrating the bone side.
Another mistake is not seasoning both sides. Even though the meat side is the star, seasoning the bone side helps build flavor throughout the rack.
Do not skip the foil wrap. The foil helps hold in moisture during the oven bake and creates a tender result.
Do not rush the oven step. The ribs need time at 300 degrees to become tender. If you pull them too early, they may not have that soft, pull-apart texture.
Be careful when transferring the ribs to the grill. After 2 hours in the oven, they can be delicate. Use a large spatula or tongs with support so they do not fall apart.
Do not sauce too early on the grill. BBQ sauce can burn because of the sugar content. Add it during the final grilling stage so it can tack up without turning bitter.
Do not walk away during the grill finish. The ribs only need a few minutes per side, and they can go from perfect to too dark quickly.
Frequently Asked Questions
Can I make these ribs without a grill?
Yes. If you do not have a grill, you can still make the ribs in the oven. After the 2-hour bake, unwrap them, brush with BBQ sauce, and place them back in the oven for 1 hour at 275 degrees, adding more sauce halfway through.
Can I use baby back ribs?
Yes. Baby back ribs work great with this method. They may be slightly smaller and leaner, so check them after the 2-hour oven bake. If they are already very tender, move on to the grill finish.
Can I use spare ribs or St. Louis-style ribs?
Yes. Spare ribs and St. Louis-style ribs also work well. They are usually larger and meatier, so they may need slightly more time depending on the rack.
Do I have to use mustard?
No, but mustard is a great binder. It helps the seasoning stick and adds a subtle tang. If you do not want to use mustard, you can use a light coating of oil instead.
Will the ribs taste like mustard?
Not really. Once the ribs are seasoned, baked, grilled, and sauced, the mustard flavor becomes very subtle. It mostly helps the BBQ rub stick.
What temperature should the oven be?
Bake the ribs at 300 degrees. This is warm enough to cook and tenderize the ribs in about 2 hours while still keeping them moist inside the foil.
How do I know when the ribs are ready for the grill?
The ribs are ready for the grill when they are tender and the bones are starting to poke out. The meat should have pulled back slightly from the bones.
Should I put BBQ sauce on before baking?
No. Add the BBQ sauce during the grill finish. This keeps the sauce from burning and allows it to thicken and tack up properly.
What if the ribs break when I take them off the grill?
That just means they are very tender. Use a large spatula or support the rack with both tongs and a spatula when moving them.
Can I make these ahead of time?
Yes. You can bake the ribs ahead of time, keep them wrapped in foil, and finish them on the grill when ready to serve.
Recipe Card
Oven Baked and Grill Finished BBQ Ribs
These oven baked and grill finished BBQ ribs are tender, saucy, smoky, and easy to make at home. The ribs are seasoned with mustard and BBQ rub, baked in foil until tender, then finished on the grill with BBQ sauce until sticky, glossy, and full of flavor.
Prep Time: 15 minutes
Cook Time: 2 hours 20 minutes
Total Time: 2 hours 35 minutes
Servings: 2 to 4
Ingredients
- 1 rack of ribs
- Yellow mustard, enough to coat both sides
- Your favorite BBQ seasoning blend, enough to generously coat both sides
- BBQ sauce, for brushing
Directions
- Pat the rack of ribs dry with paper towels.
- Remove the membrane from the bone side of the ribs.
- Coat both sides of the ribs with a thin layer of mustard.
- Season both sides generously with your favorite BBQ seasoning blend.
- Wrap the ribs tightly in foil and place on a sheet pan.
- Bake at 300 degrees for 2 hours.
- After 2 hours, carefully remove the ribs from the oven and unwrap.
- Transfer the ribs directly to a grill over medium-high heat.
- Place the ribs meat side down, close the lid, and grill for 5 minutes to get color.
- Flip the ribs so the bones are facing down.
- Brush BBQ sauce over the top of the ribs, close the lid, and grill for 5 minutes so the sauce thickens and tacks up.
- Flip the ribs and brush BBQ sauce on the bottom side. Close the lid and grill for another 5 minutes.
- Turn the ribs one more time and sauce the top again.
- Once the ribs have nice color and the sauce is glossy and sticky, remove from the grill.
- Let rest for a few minutes, slice between the bones, and enjoy warm.
Final Thoughts
These oven baked and grill finished BBQ ribs are one of the best ways to make tender ribs at home without needing a smoker or an all-day cooking process. The oven makes the ribs tender and juicy, while the grill gives them the color, char, and sticky sauce finish that makes them feel like true BBQ ribs.
The mustard binder and BBQ seasoning create a flavorful base, the foil wrap keeps everything moist, and the final layers of sauce on the grill give the ribs that glossy, tacky coating everyone wants. By the time they are done, the ribs should be tender, saucy, and full of flavor.
This method is reliable, approachable, and perfect for anyone who wants backyard-style ribs without overcomplicating the process. Slice them up, serve them warm, and enjoy every sticky, tender bite.
Oven Baked and Grill Finished BBQ Ribs
2
15 min
These oven baked and grill finished BBQ ribs are tender, saucy, smoky, and easy to make at home. The ribs are seasoned with mustard and BBQ rub, baked in foil until tender, then finished on the grill with BBQ sauce until sticky, glossy, and full of flavor.
Ingredients:
- 1 rack of ribs
- Yellow mustard, enough to coat both sides
- Your favorite BBQ seasoning blend, enough to generously coat both sides
- BBQ sauce, for brushing
Instructions:
- Pat the rack of ribs dry with paper towels.
- Remove the membrane from the bone side of the ribs.
- Coat both sides of the ribs with a thin layer of mustard.
- Season both sides generously with your favorite BBQ seasoning blend.
- Wrap the ribs tightly in foil and place on a sheet pan.
- Bake at 300 degrees for 2 hours.
- After 2 hours, carefully remove the ribs from the oven and unwrap.
- Transfer the ribs directly to a grill over medium-high heat.
- Place the ribs meat side down, close the lid, and grill for 5 minutes to get color.
- Flip the ribs so the bones are facing down.
- Brush BBQ sauce over the top of the ribs, close the lid, and grill for 5 minutes so the sauce thickens and tacks up.
- Flip the ribs and brush BBQ sauce on the bottom side. Close the lid and grill for another 5 minutes.
- Turn the ribs one more time and sauce the top again.
- Once the ribs have nice color and the sauce is glossy and sticky, remove from the grill.
- Let rest for a few minutes, slice between the bones, and enjoy warm.